
Struggling with a snug space? Welcome to the club! In today’s urban landscape, small living spaces are a reality for many. But don’t let limited square footage cramp your style. It’s all about embracing the cozy and recognizing the opportunity to flex those creative muscles. Enter: the world of small space solutions, where ingenuity meets functionality to transform teeny-tiny rooms into havens of efficiency and style. The key lies in strategic choices and a few design tricks that will make your compact quarters feel downright spacious. First and foremost, embrace the power of dual-purpose furniture. Invest in pieces that do double duty, like a sofa with hidden storage or a drop-leaf table that can moonlight as a workspace during the day and elegant console table by night. Think vertically too; utilize those lofty heights by opting for floor-to-ceiling shelving or installing floating shelves to display your beloved novels, decorative vases, or family photos. This draws the eye upward, creating the illusion of extra height and space. Another clever tactic is to let there be light – both natural and artificial. Maximize the flow of sunshine during the day by opting for sheer curtains, which allow more natural light to enter the room and create a brighter, airier atmosphere. Come sunset, layer your lighting with a mix of ambient, task, and accent lighting to illuminate every nook and cranny.
Author: Gregory Clark
How to Fix a Leaky Faucet: A Step-by-Step Guide
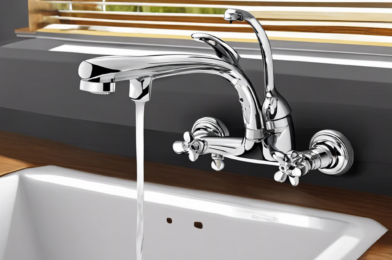
A leaky faucet is not only annoying, but it can also waste a significant amount of water and drive up your water bill. Fortunately, fixing a leaky faucet is a relatively simple task that you can often do yourself without calling a plumber. This step-by-step guide will show you how to fix a leaky faucet and save yourself some money.
First, turn off the water supply to your faucet. There are typically two valves beneath the sink: one for hot water and one for cold. Turning these valves clockwise will shut off the water flow to your faucet. Once the water is off, turn on the faucet to drain any remaining water in the lines.
Next, identify the type of faucet you have – compression, cartridge, ball, or ceramic disc – so you can disassemble and repair it properly. A compression faucet, for instance, will have two handles and a dripping leak likely means the washer needs to be replaced. A cartridge faucet has a single handle and leaks when the O-ring is damaged. Identifying the type of leak and the faucet will help you prepare the right tools and replacement parts for the job.
Now you’re ready to begin disassembling the faucet. Start by using a screwdriver to remove the screw cover on the faucet handle, then remove the screw itself. Lift off the handle and set it aside carefully, as you’ll be putting it back on later. With the handle removed, you should now be able to see the faucet’s inner workings, including the stem and cartridge (or compression valve, depending on your faucet type). Use an appropriate wrench to carefully remove these parts, taking note of their orientation and any other unique characteristics so you can reassemble them correctly.
With the inner parts exposed, you can now identify the source of the leak and address it. Common issues include worn-out washers, damaged O-rings, or a corroded valve seat, all of which can usually be fixed with a simple replacement of these parts. It is always recommended to consult a professional plumber or hardware store expert to ensure you have the right replacement parts for your specific faucet model and problem.
Before reassembling the faucet, clean the parts you removed and apply a suitable faucet grease to provide lubrication and help prevent future leaks. Reassemble the faucet by following the steps in reverse, making sure everything is properly aligned and tightened. Turn on the water supply valves beneath the sink and test your faucet. With any luck, your leaky faucet should now be working properly, and you’ve successfully avoided an unnecessary expense.
However, if the leak persists or you’re unsure about any part of the process, don’t hesitate to contact a professional plumber. While this guide provides a general framework for fixing a leaky faucet, every plumbing situation is unique, and it’s always best to seek expert advice when in doubt. Remember, a small leak can turn into a big problem if left unattended, so addressing it promptly is key to maintaining the efficiency and longevity of your home’s plumbing system.
We hope this article has empowered you to take on minor plumbing repairs and perhaps even inspired you to explore the world of DIY home improvement further. Happy fixing!
Wall Art Ideas: Express Your Style on a Budget

Wall art is an integral part of home décor, offering a unique opportunity to showcase your style and personality. But, often, the cost of art can be a deterrent, leaving you with bare walls and an unfinished space. Fear not! There are numerous ways to adorn your walls without breaking the bank. Whether you’re an art enthusiast, a nature lover, or a fan of all things quirky, there’s a wall art idea to suit your taste and budget.
First, consider creating a gallery wall. Gallery walls are a great way to display a variety of artwork, photos, or mementos in a cohesive manner. Start by choosing a theme or color scheme, then arrange your pieces in a way that feels balanced. You can find affordable frames at thrift stores or garage sales, or opt for frame-less options by using washi tape or clips to hang your art. This is a fantastic way to express your personality and create an ever-evolving display.
Another budget-friendly option is to create your own art. Channel your inner artist and experiment with painting, drawing, or even collage. You can find inexpensive canvases or art supplies at craft stores, or repurpose old frames and create new art to fill them. It’s a fun and therapeutic process that guarantees a one-of-a-kind piece for your home.
If you’re a nature lover, bring the outdoors in by creating botanical wall art. Pressed flowers or leaves can be framed and displayed, or you could try your hand at drying and preserving plants to create a three-dimensional display. For a more rustic look, consider mounting antlers, horns, or interestingly shaped branches or twigs.
Wall art doesn’t always have to be traditional. Get creative by using alternative materials such as fabric, tapestries, or quilts to add color and texture to your walls. You can also use wall stencils or decals to create unique patterns or quotes that reflect your style. These options are often removable, making them a great choice for renters or those who like to change their décor frequently.
DIY vs. Pro: When to Call in the Experts

Doing it yourself can be rewarding, but knowing when to bring in the professionals is crucial to avoiding costly mistakes and ensuring a job well done. Many tasks around the home or office may seem straightforward at first glance, but often, there are underlying complexities that only trained experts can navigate successfully. So, how do you decide whether to roll up your sleeves and tackle a project yourself or enlist the help of professionals?
Firstly, consider the scope and complexity of the task at hand. Simple tasks like painting a room or assembling furniture may not require professional help, and can often be completed successfully with a little research and the right tools. However, more complex undertakings, such as plumbing or electrical work, can quickly turn into disasters if attempted by inexperienced hands. Mistakes in these areas can be costly and even dangerous, so it’s generally wise to leave them to licensed professionals who have the necessary training and experience to handle any surprises that may arise.
Another factor to contemplate is the availability of specialized tools and equipment. Some jobs require unique tools that may be expensive to purchase or rent for a one-time job. In such cases, hiring a contractor who already has access to these tools can be more cost-effective. Additionally, professionals often have industry connections, allowing them to source materials at lower prices than those available to the general public.
Moreover, time is a valuable resource, and sometimes, the DIY route can be incredibly time-consuming. Professionals can often complete tasks much faster due to their expertise and efficient workflows. This is especially relevant if you’re facing time constraints or if the project impacts your daily routine. For instance, renovating a kitchen or bathroom will likely involve tight deadlines to minimize the disruption to your daily life.
While taking the DIY approach can be tempting to save money, it’s important to recognize the value that professionals bring to the table. They possess the skills, knowledge, and network to tackle projects efficiently and effectively. Sometimes, attempting to do it yourself can lead to costly mistakes and repairs, ultimately costing you more than if you had hired a professional from the start. Weighing the benefits and drawbacks of each option is essential before making a decision.
Smart Home Upgrades That Make Life Easier

The world of smart home technology is ever-evolving, and there are now countless ways to make your home more efficient, convenient, and secure. Upgrading your home with smart technology can simplify your daily routines and give you greater control over your environment. So, what are some smart upgrades that can make a real difference in your life?
One of the most popular smart home upgrades is the installation of smart lighting systems. With smart bulbs or fixtures, you can control your lighting via voice commands or an app, allowing you to dim the lights or change their color to set the mood or create the perfect ambiance for any occasion. You can also set schedules to turn lights on and off automatically, which is great for energy savings and added security when you’re away from home.
Voice assistants, such as Amazon Echo or Google Home, are another great way to upgrade your home. With a simple voice command, you can control your smart lighting, play music, get information, and even control other connected devices in your home. These voice assistants can also be integrated with smart speakers to create a whole-home audio system, filling your house with your favorite tunes or podcasts.
Automating your home’s climate control is another smart upgrade that can bring convenience and energy savings. Smart thermostats allow you to control your home’s temperature remotely and create schedules to automatically adjust the climate based on your daily routine. This means you can ensure the temperature is just right when you wake up or return home from work, without wasting energy heating or cooling an empty house.
Security is also a key concern for many homeowners, and smart upgrades can provide added peace of mind. Smart locks let you lock and unlock your doors remotely and send virtual keys to guests or service providers, eliminating the need for hiding a spare key. You can also invest in smart cameras that provide live feeds of your home, motion detection, and cloud storage for video footage, ensuring you always have eyes on your property.
Upgrading to smart appliances in your kitchen and laundry room can also bring unexpected benefits. Smart refrigerators can notify you when food items are running low or about to expire, helping reduce food waste. Meanwhile, smart washers and dryers can be controlled and monitored remotely, so you can start a load of laundry from the office or receive an alert when a cycle finishes, saving you time and keeping your laundry fresh.
For a truly efficient smart home, consider investing in a smart home hub. This central device integrates and controls all your other smart devices and systems, allowing for seamless automation and customized routines. With a smart home hub, you can create a personalized smart ecosystem that suits your unique needs and preferences.
Finally, don’t forget about the simple upgrades that can make a big difference in your daily life. Smart plugs can be used to control and automate any device that’s plugged into them, from lamps to coffee makers. And smart blinds or curtains can be programmed to open and close at set times, helping you wake up gently to natural light or providing extra privacy in the evenings.
With so many smart home upgrades available, you can create a customized and automated space that suits your lifestyle and needs. These upgrades not only make your life easier but also add a layer of convenience, security, and energy efficiency to your home. So, start planning your smart home upgrade journey today and unlock a world of possibilities.
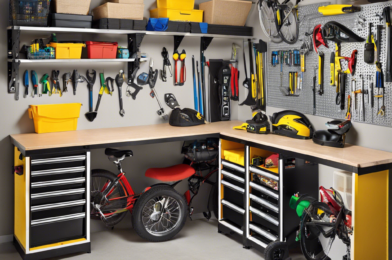
Garage Organization: From Chaos to Perfection
**Introduction**
Have you ever dreamed of transforming your chaotic garage into a functional and organized space? It’s time to turn that dream into a reality! Garage organization may seem like a daunting task, but with the right tools and mindset, you can achieve garage perfection. Say goodbye to the days of tripping over scattered tools and spending hours searching for that one missing camping gear. It’s time to embrace a clutter-free and efficient garage that will make your life easier and maybe even bring you some joy. This article will guide you through the process of garage organization, providing helpful tips and tricks to achieve a space that is both functional and aesthetically pleasing. So roll up your sleeves, grab some storage bins, and let’s get started!
**Assess and Declutter**
The first step to garage organization is to assess what you have and let go of what you don’t need. Go through all the items in your garage and sort them into three piles: keep, donate/sell, and trash. Be ruthless in your decision-making – if you haven’t used an item in over a year, chances are you don’t need it. This process will help you visualize the amount of space you need to create and the types of storage solutions that will work best for your belongings. Holding on to broken tools or obsolete equipment will only create clutter and hinder your organizational efforts.
**Utilize Wall Space**
Once you’ve decluttered, it’s time to maximize your garage’s wall space. Install shelves, cabinets, and hooks to get items off the floor and utilize the often-overlooked real estate on your walls. This strategy is especially useful for items such as gardening tools, sports equipment, and ladders, which can be easily hung or placed on wall-mounted storage solutions. Consider using labeled bins and baskets on shelves to categorize smaller items and create a cohesive look. Not only will this make your garage appear more spacious, but it will also make finding things a breeze.
**Create Zones**
Dividing your garage into specific zones will make organizing and locating items more efficient. Designate areas for seasonal items, hobbies, automotive supplies, and bulk purchases. For example, create a zone for outdoor gear with shelves for camping equipment and a basket for sunscreen and bug spray. Establishing zones will help you stay organized in the long run, as items will always have a designated space, and you won’t find yourself frantically searching through random piles or boxes. This method also makes it easier to put things away, as you’ll know exactly where they belong.
Seasonal Home Maintenance Checklist: Stay Ahead of Repairs

As a homeowner, you know that keeping your house in tip-top shape is a never-ending job. With the changing seasons, there are always new maintenance tasks to stay on top of. Taking a proactive approach to home upkeep can save you time, money, and headaches down the line. So, whether you’re preparing for the chilly winter months or the scorching summer heat, here’s a comprehensive seasonal home maintenance checklist to help you stay ahead of any necessary repairs.
Spring:
As the weather warms up, it’s time to emerge from your hibernation and assess any damage that winter may have caused. Start by checking your roof for any missing or damaged shingles, and clean out your gutters to prevent water damage to your home’s exterior. Spring is also the perfect time to service your air conditioning unit to ensure it’s ready for the hot summer months ahead. Don’t forget to give your garden some love, too, by weeding, pruning, and planting new flowers to boost your curb appeal.
Summer:
With the mercury rising, it’s crucial to keep your home cool and comfortable. Summer is the ideal time to inspect and repair your home’s exterior, including repainting or staining wooden surfaces to protect them from the sun’s rays. It’s also a good idea to check your window and door seals to ensure they’re tight and secure, helping to keep the cool air in and pests out. Keep your garden thriving with regular watering, and mow your lawn frequently to keep it looking neat and tidy.
Fall:
As the leaves start to turn, it’s time to get your home ready for the colder months. Clean your gutters again to remove any fallen leaves and debris, and consider installing gutter guards to reduce future maintenance. Fall is also the perfect time to service your heating system and replace the filters to ensure your family stays warm and cozy when the temperatures drop. Don’t forget to disconnect and store your hoses, and insulate exterior faucets to prevent freezing and bursting.
Winter:
When winter arrives, your focus should be on keeping your home safe and snug. Trim tree branches that could cause damage in the event of a storm, and check your fireplace and chimney for any necessary repairs or cleaning. It’s also a good idea to test your smoke and carbon monoxide detectors and replace the batteries if needed. Keep an eye on your pipes, especially if you’re experiencing freezing temperatures, to prevent bursting.
Stay tuned for the next part of this article, where we will continue providing you with a comprehensive seasonal home maintenance checklist to ensure your home is always in top shape!